Sunday, October 31, 2010

Mom Cave - Master Bedroom

Susan @ Between Naps on the Porch is hosting a 
"Mom Cave" linky party.

Every Mom needs one, even if your children are grown and gone....

A MOM CAVE


You can find the story about the headboard here!


The blue dress was my Mom's wedding dress! 


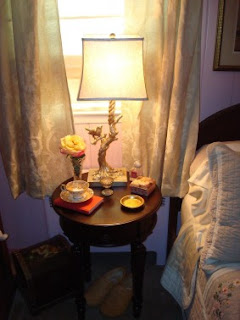
Mine's in the corner (cause sometimes I'm bad) in my master bedroom.  A chair, with good lighting for reading, near a place to sit a Diet Dr. Pepper and a Payday bar, and positioned just right for viewing Dancing with the Stars, is all I need
.


Check, check, and check.  So what's missing? 
A comfy chair.  That's right -- as pretty as I think 
this chair is, it's not comfy.
  
And who better to solve that problem?  HomeGoods! They're 
having a Mom Cave Contest and the winner gets $250 to spend on 
Mom Cave bling! 

I like bling.  I have a cave.  So I headed on over to the 
HomeGoods online store...

I found a couple of super comfy looking options at their online store.

 There were so many to pick from it made my head spin --
in a good way, of course.
 .
While I was there I was grabbed by this gorgeous bird lamp, too! 

*^*^*^*^*^*^*^*^*^*^*^*^*^*

*To see the PARTIES I link to and to join in the fun,
CLICK HERE
or check out my sweet hostesses on my sidebar!

*^*^*^*^*^*^*^*^*^*^*^*


Please *click here* and take a look around 
my Etsy Store...


If you enjoyed this post (and, gosh, I hope you did) please BECOME A FOLLOWER!

Happy Halloween!

Have a fun and safe day!!!

My daughter, Amber, and my sweet, slightly afraid grandson.  
I'm with ya, baby!


If you enjoyed this post (and, gosh, I hope you did) please BECOME A FOLLOWER!

Saturday, October 30, 2010

Revamped Step Stool

After

My Dad is gone now.  He was a sweetheart and 
I've missed him every day for twelve years.  Decades ago 
he built this sweet little step stool for my Mom and recently, 
she gave it to me.
  
I was so excited to have it!

Before


It was never meant to be pretty (just useful) so I wanted to do a little something to it.  


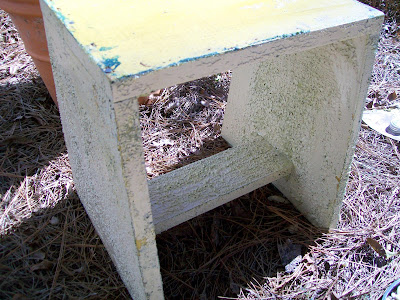
I think it had been stained, painted gold, carpeted (yes, I said carpeted!), un-carpeted (thank goodness), painted green, and finally painted its current shade of cream.  I'm thinking, if it doesn't cave under the weight of all that paint then maybe it won't cave under my weight, but, who am I kidding.


I couldn't bear to put it back down on the floor...


So what did I do with it?  Well, I'm not known for being particularly sentimental (I think I just heard several members of my family along with a few so-called friends say "duh".  HA!) -- I'm more of a no non-sense kind of gal, but, all those layers of paint meant a lot to me. So, I decided to keep them, not to strip it, and to just give the stool a good sanding to reveal ALL the colors from it's past.  


The sanding got me nowhere.  I had to bring out the big guns...

I tried a process I'd used before.  It's one of the iffy things, though,  you just never, ever know what you'll get.  


I painted on the stripper and let it do it's thing.  I didn't do anything (not even touch it) until it was all dry again.  
I just left it sitting out in the sun.


Once it was good and dry, I scraped a little and sanded a lot.


It worked.  I think my Dad must have been watching over me (wanting to know what on earth I was doing to his stool) because it came out just right -- all weather worn.  I called my Mom as soon as I was done and we had a fun talk about all the colors and places
their little stool had been.


A nice clear coat, some really cute handles (he'd roll his eyes on that one) and all that's left is to say, "Thanks, Mom and Dad."


*^*^*^*^*^*^*^*^*^*^*^*^*^*

*To see the PARTIES I link to and to join in the fun,
CLICK HERE
or check out my sweet hostesses on my sidebar!

*^*^*^*^*^*^*^*^*^*^*^*


Please *click here* and take a look around 
my Etsy Store...

If you enjoyed this post (and, gosh, I hope you did) please BECOME A FOLLOWER!

Friday, October 29, 2010

Giveaway Winner!!!

UPDATE -- 
I just had to add Carol Ann's note to me. It was too funny...
Oh my gosh...I am just tickled to pieces to be the winner of your beautiful bird pillow!
At least, I THINK I'm the winner.  My name is Carol Ann and I left a comment back on
October 18.  If not, I'll just cry in my Caffeine-free Diet Coke all weekend long....


And the winner is....
Carol Ann!

Congratulations, Carol Ann. 
Please email me with your address asap!


If you enjoyed this post (and, gosh, I hope you did) please BECOME A FOLLOWER!

Tuesday, October 26, 2010

Paint-by-Number Pillow

This Bee Pillow is available in my Cottage Hill Store


Fess up--

I'll bet most of you painted something-by-number when you were a kid.  I did.  I think mine was a picture of a swan or something.  Anyway,  I thought I'd make a numbered pattern of a bee pillow for anyone who'd like to try it again.


Let's get started--

1.  Use painters canvas -- wash and dry to pre-shrink and soften.
2.  Cut two 19"x19" pieces.
3.  Print the pattern on legal size paper.  This is only half of the pattern.  Duh. You'll have to flip the pattern over (and possibly retrace the lines on the back with a Sharpie) to draw the opposite side.


Color Key:
                                                                      1 - black/brown
                                                                      2 - white
                                                                      3 - light blue
                                                                      4 - light brown
                                                                      5 - brown
                                                                      6 - light golden beige
                                                                      7 - rust
                                                                      8 - light gray

4.  Tape the pattern to a window.  The light from the window will help you see the pattern through the fabric.

 
5.  Tape one of the pieces of fabric over the pattern, centering the pattern under the fabric.  I drew an arrow at the center of the pattern.


6.  Trace the pattern onto the fabric.  I use colored pencils in colors close to the colors I'll be painting to make the drawing.  This way the drawn lines blend in and you don't have to worry about pencil lines.
7.  Trace the leaf design in the four corners of the fabric.


8.  Start painting.  I use acrylic craft paint when I paint on fabric.  I dip my brush in water and then mix a small amount of paint in.  It's better to use a light hand and watered down paint, building the paint up to get the look you want.  This project should have a soft, water color look so use lots of water.  This also keeps the painting from getting too stiff.


Tips -- I used less water in the paint for the smaller detail so there was no bleeding of the paint.  I added a little dark brown to suggest eyes.  I also dry brushed a little white over the top of the wings when all the paint was dry.  This made them look a little more transparent.


I'll be listing this pillow in my Etsy Store soon!!!


Here's to being a kid again!

*^*^*^*^*^*^*^*^*^*^*^*^*^*


If you enjoyed this post (and, gosh, I hope you did) please BECOME A FOLLOWER!